
 Sascha
Boss ES-5 Tips II: Setting up your ES-5
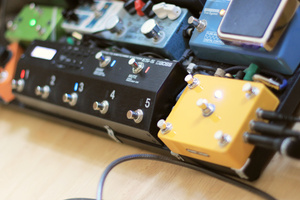
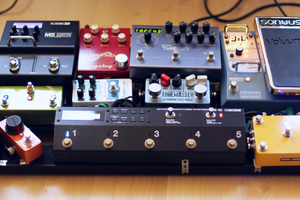
Okay, let’s have a closer look at setting up your ES-5, and the MIDI pedals on your board. If you start with making clever basic settings and creating template Patches suitable for your rig, it will make your life easier later on. Here’s a video I made with tips for ES-5 users; they are not meant as a tutorial for ES-5 starters, you will need some ES-5 basic knowledge to understand them (which is provided in this series of articles). We will get to each of those 8 tips later in this series of articles.
Table of Contents
tl; dr
Short version of first ES-5 setup steps: Make sure you are on the current firmware. For your global settings: Press EDIT, ► to the “Play Option” menu, ENTER; then, set Switch Mode to PUSH, Bank Chg Mode to WAIT, Patch Slct Mod to MODE 2 and Beat Indicator to ON. EXIT back to “Play Option” menu and ► to the “MIDI Settings” menu, ENTER; then, set MIDI Out mode to THRU, Rx Ch to any MIDI channel not used by your other pedals, Sync to INT (unless you use an external clock) and Clock Out to ON. In case your connected expression pedal or external dual footswitch doesn’t work, check the “Others” menu. Also, make sure the other MIDI pedals on your board are set up correctly to communicate with your ES-5; each with its own MIDI channel, sync to MIDI Clock active if you use your ES-5 as master clock, and MIDI Thru activated in case your MIDI pedals are chained. Done, skip to next article :-)
ES-5 Basic Functionality
The ES-5 comes with a user manual. This manual isn’t the best to make a newbie understand the ES-5. Still, it is your friend; my advice is: Read it. Especially the parameter lists on pages 9 to 12 are a very helpful reference that I keep going back to. (Oh, and there’s the add-on manual for the new features introduced in firmware v2.0, too.) Another helpful resource is this online guide on the website of Roland Australia.
So, what does the ES-5 have to offer? There’s three basic modes:
- Manual Mode: You can turn on/off each of the 5 loops individually with the footswitches #1 to #5
- Memory Mode: You can switch between presets; Boss calls them Patches. 5 Patches make a Bank, 5 Banks make a Group, and there is a total of 8 Groups. So, there’s a total of 5 × 5 × 8 = 200 Patches.
- Edit Mode (Boss calls it “Memory Edit Mode”): Here, you can make a lot of settings both on Patch and on Global level.
Typically, you will create your Patches in Edit Mode; and you will play gigs and rehearsals in Memory Mode. Manual Mode can be used for experimenting/jamming, or for those occasions where you just want to switch on/off one specific loop within one Patch.
Some people say they only use Manual Mode. To me, this is a waste of resources; if you only want to manually switch 5 loops, there’s way cheaper and smaller devices than the ES-5. The powers of the ES-5 lie in its ability to save Patches with different loop on/off combinations, with different orders of loops, and adding MIDI and TRS switching jacks to that mix. To unleash those powers, learn to use Memory Mode.
So, what can you save in a ES-5 Patch?
- You can store which of the 5 mono loops will be switched on/off.
- You can change, and store, the order of those 5 loops.
- You can have two parallel signal paths, and put any loop in any of those two parallel paths, or before, or after; and store those paths.
- Or, you can set one loop to carryover (you cannot have parallel paths and carryover in the same Patch); meaning: a delay/reverb in that loop will trail on once the loop is switched off.
- You can store the on/off status of the 4 switching functions (2 TRS jacks with dual switching capability)
- You can define 8 “Patch MIDI”s (PMIDI); each one capable of sending one Program Change (PC) and 2 Continuos Controller (CC) messages on one MIDI channel. Plus, MIDI bank change data (MSB and LSB).
- Within some limits, you can change and store what the internal footswitches of the ES-5 will do; like, you can tell the MUTE footswitch to no longer mute the signal, but instead to switch channels of your amp via one of the ES-5 TRS control outs. There is 8 so-called Assigns per Patch; each one will allow you to route one source action (like hitting “MUTE”) to one target action (like switching CTL Out 1).
- Possible sources not only include the on-board footswitches, but you can also connect either an expression pedal or an external dual footswitch as additional sources. And, you can use incoming MIDI CC commands to trigger ES-5 actions.
- Finally, there’s internal ramp generators (called “INT”, “Internal pedal” and “virtual expression pedal” by Boss) and LFOs (called “WAV” and “wave pedal” by Boss) that can be used to control external MIDI devices.
We will get to details later; this is just to give you an impression what the ES-5 can do. So, how do you set it up in the first place?
Setting up your ES-5
Power up your ES-5. Press the EDIT button. Now, with the cursor buttons ◄ and ►, you can scroll through 8 menus; you can find all ES-5 functions/settings in these 8 menus. With the ENTER button, you can go inside a menu and navigate menu pages with ◄ and ►. ENTER again to make settings on a menu page, using ◄ and ► to navigate and - and + to change values. DISPLAY/EXIT will take you out of the menu/page you are currently in. WRITE will write the current patch.
Now, what can be confusing: The first two menus, PATCH and CTL/EXP, contain settings for the current Patch. (In certain scenarios, some CTL/EXP settings will also have a global effect ... we will get there later.) When you change those settings, you need to save the Patch by pressing WRITE three times – otherwise your changes will be lost when you switch to another patch. The other six menus however are global; changes you make there will affect all Patches, and are written to the permanent memory of the ES-5 right away, not needing any WRITE/saving procedure.
Let’s check which global settings you may wanna make in those 6 global menus. No, wait ... first let’s check if your ES-5 is on the current firmware. You can find out by holding EDIT while powering up your ES-5. This article assumes version 2.01, which was released in August 2017; there were no updates in the meantime (at least until September 2019). Still, you may wanna check on the boss website for newer versions; that where you will also find the firmware files and installation instructions.
Also, before we dive deeper into global settings: In case you bought your ES-5 second hand, you may first want to reset it to factory settings. To get there, press EDIT, navigate ► to “Utility” (last menu on the right), ENTER, navigate ► to the final item “Factory Reset”, ENTER. You can reset only the global settings (SYS), or also all Patches, or all Patches from 111 up to a number of your choice.
Global Settings
So, lets have a look at those global menus ... short version: The only ones you really need to care about are “Play Option”, “MIDI settings” and “Others”. The 6 global menus are:
- Play Option:
This is the most important one. We will cover it in detail below. - Preference:
This menu lets you define whether certain settings will be per patch, or global. Will also be covered in detail below. - MIDI Settings:
“MIDI Out mode” should be THRU if you have devices before the ES-5 in your MIDI chain that should communicate with pedals after the ES-5.
“Rx Ch” is the MIDI receive channel. Only actually needed if you use another device to switch ES-5 Patches via MIDI. Set it to a free MIDI channel not used by other pedals on your board (on my ES-5, it’s set to 14).
“Dev ID” can stay at 1 (if you have more than one ES-5, give them different IDs).
“Sync” should be INT, unless you use an external clock such as the Selah Quartz or the Disaster Area SmartClock driving your ES-5.
“Clock Out” should be on, if you want to use your ES-5 to sync the tempo of connected MIDI pedals. - PC Map:
Here, you can freely assign ES-5 Patches to incoming MIDI program change commands. You only need this in case you want to use another device to switch ES-5 Patches, and you are not satisfied with the factory settings. Normally, you will not need this menu. - Others:
Here, you can set the contrast of the ES-5 display (I recommend “7”); also, if you have either an expression pedal, or a dual footswitch, connected to your ES-5 CTL In, you can set the polarity for those here. Just check which of the two polarity settings produces correct results with your gear. - Utility:
This is mainly for operations like copying/exchanging Patches, Banks and Groups. I never use those, since you can do most of this easier in the ES-5 editor software. Also, as described above, you find the Factory Reset function in this menu.
One additional note on dual footswitches connected to CTL In: The ES-5 manual recommends momentary-type switches. But the ES-5 also works with latching switches, they just behave a little strange: My footswitch is a latching dual footswitch with a TRS jack; connected to the ES-5 CTL in with a regular TRS cable. Now, when I power up my ES-5, I always have to “wake up” those switches first: I need to hit the each switch a few times. “A few times” as in: irregular; sometimes 2 kicks will do, sometimes I need 7 or 8. Once one switch will start to function, the other will immediately work, too, and they will both keep on working perfectly until I switch off my ES-5. It has been like this from the beginning. And the polarity settings that you can make in the “Others” menu don’t seem to have an impact on this behaviour. It’s something I can gladly live with, it’s just crucial not to forget “waking up” those switches before playing a live gig.
Preference
This is a quite powerful feature, and it took me long to understand it (sorry to readers of earlier versions of this blog post!).
First item in this menu is the ES-5 Input Buffer; which you can set here to be always ON, or always OFF, or being switched on/off depending on Patch settings (PAT). My choice here is PAT – I normally don’t like the sound of the ES-5 Input Buffer, so I keep it switched off in most Patches, but I use it on a few Patches for ultra clean 1980s sounds.
The other items in this menu concern the 7 onboard footswitches (BANK, MUTE, NUMBER 1 to NUMBER 5), the optional external footswitches (CTL IN 1 and 2), and the optional external expression pedal (EXP IN). You can switch each of those 10 controls to be either PAT or SYS. Now, what does this mean?
In the CTL/EXP menu, you can define the basic function of each of those 10 controls (as described here). Depending on the basic settings you made in the Preference menu, the settings you will make under CTL/EXP would either only affect the current Patch (PAT), or they would have a global impact on all Patches (SYS).
What would you use this for? Me, I have everything set to PAT in the Preference menu. But SYS comes in handy if you for example want to convert the MUTE switch globally into a Bank Down switch. For this, you need to set MUTE to SYS in the Preference menu first. Then in a second step, in the CTL/EXP menu, you would go to the MUTE page – display will read “MUTE (SYS)” – press ENTER, and set Func to BnkD. Voilà, the MUTE footswitch now works as a global Bank Down footswitch (provided that Patch Slct Mod is set to default value 1 in the Play Option menu).
Important note: Setting either footswitch to SYS in the Preference menu will not mean that individual per-Patch settings that you may have made for that footswitch will be lost. As soon as you change Preference back from SYS to PAT, everything will be back to the way you had stored it before.
Okay, drumroll, let’s now dive into the most important of the global menus ...
Play Option
The “Play Option” menu is a central place to customize your ES-5’s user interface. Stuff you can do here:
- Set the Switch Mode to either PUSH or RELEASE. This defines when a switching action happens: Will you change Patch from 121 to 124 the moment you hit the #4 footswitch, or the moment you release it? This is mainly a matter of personal preference; I would prefer PUSH, since it gives me a faster reaction.
- Set the Bank Chg Mode to either WAIT or IMMEDIATE. IMMEDIATE is faster, when you want to go to a Patch with the same final digit on a different bank; like, from 114 to 124. But it will give you unwanted stopovers in most other scenarios; like, when you want to go from 114 to 125, you would have to either pass 124 or 115 on the way. If you never change Banks in the middle of a song, IMMEDIATE may work for you. Else, WAIT is the way to go.
- Set the switching mode for the ES-5 TRS switching jacks (CTL Out 1/2 and 3/4; labelled C1, C2, C3 and C4 here). Standard would be LAT; depending on which devices you want to remote-control from your ES-5, other settings might apply; especially when sending tap tempo to pedals with a remote tap input jack. Explained in detail on page 12 of the manual.
- Define the Bank Extent – this is only works in Patch Select Mode 1 (I recommend Mode 2; see below). Also, it’s only relevant for people who don’t want to use more than 20 different patches; so, not relevant for me :-)
- Some MIDI pedals may give you popping noises when changing presets (my ProStage Remote Wah is one of the offenders here). If you get such noises when changing ES-5 Patches, you can avoid them by setting your Patch Chg Time to somewhere between 1 and 10. This will mute the ES-5 for a short time; in my case, “3” is enough to avoid those popping noises.
There’s downsides to this: There will be a short silence when changing patches; trails of delays/reverbs or a looper on playback in any of the ES-5 loops will be interrupted shortly. So, if you don’t have trouble with clicks and pops when switching ES-5 Patches, you should keep Patch Chg Time at 0.
Also, be aware that if you tap into your signal path somewhere before the ES-5 output – like, going to a second amp from some pedals secondary output – the muting will have no effect there, since it happens right at the ES-5 main output. - Patch Slct Mod will be covered below; for several reasons, I recommend MODE 2 (tip #1 in my video)
- Beat Indicator will let your Bank LED flash at the speed of the ES-5 clock (Master BPMs). This is a great feature to have a visual indication of the current master tempo. If you use the ES-5 clock at all, you should set this to ON.
These are the available menu pages if you are on an older firmware. With firmware 2.01, there’s some more pages (I need none of them):
- NUMBER1(MAN) to NUMBER5(MAN) will let you assign which loops the 5 number footswitches will switch in Manual Mode. I have no idea why anybody would want to do this (except maybe to have the loops ordered right-to-left rather than left-to-right). Of course, it would be great to have the option of using these 5 switches for other stuff than switching loops in manual mode; such as, switching the CTL Out jacks, or sending MIDI commands. But alas, this is not foreseen here.
- Tempo Hold will switch the ES-5 from Patch-based tempo to global tempo when set to ON. That is, the ES-5 will keep the current tempo until you tap in a new one; regardless of the tempo stored in any Patch that you will switch to. For me, this doesn’t work: I want the tempo which I stored in my Patch; and if I tap in a new tempo, I’m fine if this is only valid until I switch to another Patch. So I may switch Tempo Hold to ON when I play a fully improvised jam with a live drummer; but in all other scenarios, it will always be OFF.
- Finally, there’s Link; this is for linking two ES-5s together. Like, when you have one as your floor board, and a second one switching stuff in the rack, I guess. Never tried this.
Patch Select Mode 2 (and why to use it)
What Boss calls “Patch Select Modes” actually defines how the ES-5 switches Banks (not Patches). In the factory setting with MODE1, the BANK footswitch will cycle through the Banks of the current Group; like 122 → 132 → 142 → 152 → 112 → 122. You can narrow down the available banks with the Bank Extent function described above, so you could have e.g. 122 → 132 → 112 → 122; which makes it faster to reach any Patch in the selected Banks, but makes the unselected Banks unreachable “by foot”.
So, if Bank Extent is no option for you because you want to access all Banks, then reaching certain Patches will require five kicks. Like, to get from 122 to 114, you need to hit BANK → BANK → BANK → BANK → #4. And what’s worse, if you accidentally hit BANK once too much, the whole cycle starts from the beginning.
Patch Select MODE 2 makes this easier: Hitting BANK once will put the ES-5 into a temporary “Bank select state” (hitting BANK for a second time will get you out again). Then, pushing any number footswitch will take you to the corresponding Bank. So, hitting BANK → #Bank number → #Patch number will get you to any Patch of your current Bank. Like, to get from 122 (or any other Patch in Group 1) to 114, you would hit BANK → #1 → #4.
Reasons I prefer this mode:
- It’s faster, since you need slightly less kicks by average (0.5 kicks less by average to reach any Patch of the same Group, but on a different Bank).
- It’s faster, since you always can tap the exact same pattern to reach a certain number (like, no matter on which Patch of Group 3 you are, to reach Patch 352, you can always kick BANK → #5→ #2. Of course, if you are in Bank 5 already, kicking only #2 will do, to).
- This also means: If you work a Mute/Tune Patch per Group (tip #2 in my video, will also be covered in the following article), you can always get there with the same combination of footswitches (like, on my board, BANK → #5→ #5 will take me to one of my Mute/Tune Patches from anywhere, as long as I am in Memory Mode).
- You can give the BANK footswitch a secondary function to do Tap Tempo (tip #3 in my video).
BTW, with global settings (using the Preference menu as explained above), you could also set up two footswitches, like BANK and MUTE, to be Bank Down (BnkD) and Bank Up (BnkU) globally. For this, you need Patch Select Mode 1; and it is even faster than Patch Select Mode 2 (again, 0.5 kicks less by average to reach any Patch of the same Group, but on a different Bank; and 1 kick less compared to Select Mode 1); but you need to sacrifice a second footswitch for this functionality. And you won’t get the extra benefits listed on the last three points of the above reasons list.
Setting up other Pedals
Before we come to creating ES-5 Patches in the next article, let’s quickly have a look at the other pedals on your board. In the previous article, we already covered signal chain: So, you should have decided by now which pedal goes in which ES-5 loop, which pedals may share a ES-5 loop, and how your MIDI chain goes.
What remains to do is to set up your other MIDI pedals in a way that they communicate well with the ES-5. This typically means:
- Set each MIDI pedal to its own MIDI channel (which also should be different than the MIDI Rx channel defined in the ES-5 MIDI Settings). If you have, or plan to get, a Disaster Area MIDI controller that you want to use with your ES-5, be aware that those controllers only work on MIDI channels 1 to 4.
- Activate “MIDI Thru” on all pedals that need to pass MIDI to the following pedal (some pedals always do that; some, like the Line6 M5/M9/M13, can’t do this at all and need to be placed at the end of the MIDI chain).
- Some pedals allow you to reduce the amount of MIDI data they send. This can make your MIDI chain work better. Like, the Strymon Timeline (firmware 1.84+) let’s you select between MERGE (the MIDI out combines incoming data and data generated by the Timeline) and THRU (Timeline MIDI out only passes incoming data, without adding stuff). THRU will keep your MIDI signal cleaner; however, if you want to use the Nixie editor software, you will have to switch back to MERGE.
- Make the right MIDI clock settings. Like, if you use the ES-5 as your master clock device, all other pedals should be set to sync to this clock, and to not send out own MIDI clock signals.
- Some pedals can be set to sync, or not sync, to MIDI clock per preset. Strymon Timeline can do this in firmware 1.84+; Line 6 M5/M9/M13 can effectively do the same by setting delay/modulation times to note values (sync) vs. ms/Hz values (no sync). This is a very important feature: Like, if you have a slapback delay, you don’t want to sync delay time to MIDI clock. Same is true if you use your delay to create a reverb-ish ambience. So, for those presets, make sure MIDI clock sync is off; while it should be on for your rhythmic delays.
Now, you should be ready to create template Patches on your ES-5; which will be covered in the following article.
Comments