 Sascha
Boss ES-5 Tips I: Building your Pedal Board
This article is about planning and building an ES-5 based pedal board. Content applies also to pedal boards with other MIDI-capable loop switchers; actually, most content applies to any pedal board build. Got your board up and running already? Then you can skip this article and read on here.
There’s a lot of stuff to consider when building a pedal board: Which basic board will you use? Which power supply? How will you mount your pedals to the board? Which pedals have to be on the board? Where to put each one? Which cables to use? There’s no “one size fits all” answers here, but I will discuss my preferred solutions.
Table of Contents
Finding the Right Platform
To build a pedal board, you first need some kind of platform. This can be a piece of wood, an old suitcase, a cheapo IKEA GORM shelf board, one of the various readymade pedal boards that are on the market today, or a custom made one. There’s custom builders who will not only make the board, but who will do the complete build including mounting and wiring the pedals; this may save you days of work, but it will also cost serious money, and may take some fun out of the process.
Unless you are playing only at home, or only big tours with roadies, weight is an issue. I live in a 2nd floor appartment in an old building in the middle of Cologne, no elevator, no garage. I want to be able to carry my guitar, amp and pedal board all at once alone from the flat to my car, wherever it is parked. So, my pedal board needs to be as light weight as possible; and either the pedal board or the guitar should be in some kind of backpack.
When it comes to light weight, aluminium wins over wood. There’s the classic Pedaltrain design that has been copied by various companies, and the newer Templeboards that also have inspired several copies. Check any larger online music store, you will find lots of variants in different price ranges (for me, Temple is way to expensive). Unless you only play at home, you should get some kind of case; for serious touring, a flightcase is the most solid solution. But it’s heavy; so if you don’t play long tours, but rather 10 to 20 gigs per year like me, you may wanna go with a softcase. Pedaltrain and others offer softcases that can also be worn as a backpack.
Now, what size do you need? One approach is to think “which pedals do I want on my board”, and to check how big your board needs to be to accomodate them. The risk in this: There’s so many great pedals out there, you could go full-on John Frusciante and build a monster board. But who will carry it for you? So, after my previous large board (76×40 cm/30"×16", pressboard based) was awfully heavy, I decided to limited myself to a 62×31 cm platform (roughly 24.5" × 12"). I’m really using a lot of effects; I guess that 95% of you players out there will get along with a board this size or smaller, if you plan your board cleverly and if you are ready to avoid XL sized pedals.
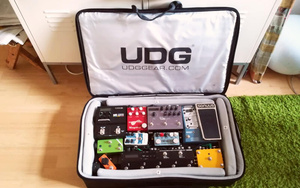
So, my platform is a Rockboard Stage; kind of a Pedaltrain Classic 1 clone, but slightly wider, and available for 89 €. Including a softcase, but a crappy one: you cannot use it as a backpack, and it won’t protect your pedals well. Someone on the German FB Pedal Board Group recommended UDG products to me, and I bought their Urbanite MIDI Controller Backpack Large – paid 213 € incl. shipping, but never regretted it: This thing is really well-made and sturdy, and it comes with velcro-cushions that you can configure to suit your pedal board perfectly. There’s 3 extra pockets for cables and stuff. And meanwhile, you can get it for 139 €.
Planning your Pedal Board
There’s two approaches to pedal board planning: One is “don’t plan; just velcro some pedals to the board and change them like every other day”. This is great for simple boards, and for people who are constantly trying new pedals. Alas, for boards with programmable switchers and MIDI, it doesn’t work so well: Like, when you’ve spend days to program great sounding Patches, and then exchange the pedal(s) in one of the loops, lots of Patches will sound different. Also, you have three layers of wiring going on (audio, electric power, MIDI). So, if you plan a board with a programmable loop switcher and MIDI pedals, my suggestion would be to rather plan the board well, then build it, program your Patches, learn to play the board well, and play it for at least a year before changing pedals.
So, whether you let your platform size limit your pedal selection, or let your pedal selection define your platform size: Time to plan the layout of your board! There’s several pedal board planner apps, including the ones by Pedaltrain, Temple and Guitarchalk. There’s one by ModularGrid that is supposed to be really cool, but you need to make an account to use it, did’t try that yet. I tried the first three; none of them has my Sonuus Voluum or Kingsley Minstrel as options (and those are not really exotic pedals) ... okay, some allow to submit additional pedals and brands. But for me, the easiest solution is to use MS PowerPoint. It’s on my computer anyway; I just need to find out the exact dimensions of my pedals (easy to find online for most manufacturers; and if you have the pedals already, you can just measure, which is even safer). Then, I create rectangular objects with those exact sizes, give them names and colours. This is how the plan for my current board looked in PowerPoint:
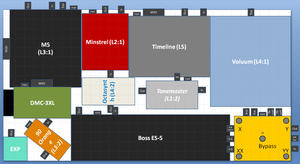
As you see, you can also add shapes for jacks/connectors, which I only did in a quick’n’dirty way here ... still, good enough that the actual build worked out. BTW, I put my M5 and Timeline on risers, making their footswitches easier to reach, and allowing to have jacks/cables from the neighbouring pedals to run under them.
Also, you can see that I like to plan my boards tight, wasting as little space as possible (original plan included a Mooer ElecLady flanger next to the Ninety Orange phaser; but that was too tight, so the ElecLady had to go, and the Ninety Orange had to be mounted diagonally). Many other people will prefer to build with more space between the pedals; making changing pedals and servicing easier; and minimizing the risks of hitting the wrong footswitch in a live situation, or of your well planned board layout not functioning in reality, when some MIDI plugs are fatter than you thought.
When designing your board, you should also think about where to mount your power supply (mine is mounted under the board) and where your cables will run. Plus, check if your wah picks up hum from your power supply ... if it does, make sure to mount the wah at maximum distance from the power supply.
Planning your Signal Chain
One great feature of the ES-5 is that it can freely reorder its 5 loops per Patch. So, technically, it actually doesn’t matter which pedal you put in loop #1, and which in loop #2 etc.; it just makes things easier to remember if you follow your normally used pedal order. It does however matter which pedals you put in a loop together; since the ES-5 cannot change their order, nor can it bypass them individually ... unless they can be bypassed via MIDI, or via TRS jacks from the ES-5 CTL outs.
So, you could put a Line 6 M5 into a Source Audio Ventris together into an ES-5 loop, and switch them individually on/off via MIDI; and you could still put both of them in front of your dirt pedals on some ES-5 Patches, in case you would need that for some crazy effects. But you could not put the Ventris before the M5 without rewiring the board. Same would be true if you put e.g. a Bogner Ecstasy (not Mini) pedal and a Boss DS-2, which both have remote switching jacks, together in one loop: You could switch the Bogner’s drive and boost circuits separately, and the DS-2 on/off, via the ES-5 TRS CTL outs. But you couldn’t reverse their order.
Also, pedals that you put before the ES-5 input, or behind the output, will always stay in their fixed position in the signal chain and can only be bypassed via MIDI, or via TRS jacks. So, if you happen to own a Strymon Timeline and a Strymon Big Sky, and you want to use them in stereo, and you always want them last in your signal chain: Just put them behind the ES-5 output and have the ES-5 control them via MIDI. But keep in mind: If you want to use the Timeline as looper, and you want to record reverb from the BigSky into that looper, than the signal chain needs to be ES-5 → BigSky → Timeline. While normally, you would put the reverb after the delay. Tough choice, isn’t it?
Anyway, me, I don’t need a separate loop for each pedal. I like that the ES-5 allows me to recall radically different combinations of active pedals, and of MIDI presets on my 4 MIDI pedals, very quickly. Yet, I’m fine with a board that is not 100% total recall. Like, I need to switch my analog Phaser on/off manually if I need it (I only use it on very few songs). I can live with having my dirt section (JDM Tonemaster fuzz/booster into Kingsley Minstrel overdrive) in one loop. I normally have the Kingsley on, and both halfs of the JDM off. So I can always manually kick in the JDM to add fuzz or gain boost to my drive sound. If I already want boosted gain on a Patch right from the start, I use the ProStage Remote Wah for that purpose, that can act as a MIDI controlled boost if needed.
Audio Cables
So, time to think about cables. Solderless cables have become a popular option for pedal boards in the last decade, there’s several brands on the market today. I do have some Lava Tightropes on my board, the plugs are nice and small, they are not too difficult to assemble, and if you do it right, they will work reliably. Still, many people encounter problems with solderless cables. If you have soldering skills, you can of course solder your own cables; but I’m not sure if you can find solder-able plugs that are small enough to work with the tight spacing of the jacks on the ES-5.
My suggestion would be: Rather than assembling DIY cables, go with EBS flat cables; they have tiny angled plugs that work well with the ES, they come in a variety of different lengths, and they are mostly reliable; I’ve got 12 of them on my board since autumn 2017, none of them ever failed. They get many positive reviews, and they seem to be sturdier than the clones made by Warwick/Rockboard and others. There’s also gold plated versions; the gold may be mostly voodoo, but their plugs are even smaller than the regular EBS ones, that’s why I used them for my board.
Plan the required cable lengths well, and don’t plan to tight; often, the cable needs to run a slightly longer distance than you first think. Also, solderless cables get shorter during assembly, at least with angled plugs, since part of the cable goes around the corner. For a clean wiring, you may want to have your cables run along rectangular paths (to get an idea, check the gallery of Nice Rack Canada, the kings of clean wiring); make sure your cables are long enough for that.
MIDI Cables
When it comes to angled MIDI cables, you have to check in which direction the cable will leave your MIDI pedals; consider that 5 pin MIDI jacks are not always mounted the same way. Like, the ES-5 and the Line 6 M5 have them mounted upside-down, compared to e. g. a Strymon Timeline. I am using different MIDI cables, including the One Control MIDI hammer, which is a kinda small cable (though the plugs are fat), and you can have the cable leave the plug in two different directions. Best-Tronics has angled MIDI cables that take this concept further, allowing you to rotate the MIDI plug to 8 different positions relative to the cable outlet.
Carefully plan your MIDI chain (which can be planned completely independent of your audio chain). Like, I use a Disaster Area DMC-3XL Gen1 MIDI controller which has no MIDI input; so this needs to go first, into the ES-5, then to my Sonuus Voluum. Since I use the Sonuus as MIDI expression pedal to control my other pedals, it needs to go before them in the MIDI chain. Then, to the ProStage Remote Wah, the Strymon Timeline and then finally to the M5. The M5 (as the M9 and the M13) does have a MIDI Out, but no MIDI Thru functionality; so it needs to be last in the chain. If you have more than one “dead end” MIDI device like this, you will need something like the MIDI Solutions Quadra Thru that can split one MIDI input to four outputs.
Power Supplies
Most pedal power supplies come with an included set of cables. The GigRig Generator system is modular and works with customizable cable lengths; this is probably the most flexible power supply system. At 5000 mA per generator, it’s also strong enough to power a big board full of hungry pedals. Another system providing strong and clean pedal power is the Strymon Zuma (4500 mA) which can be expanded with their Ojai.
However, most boards will not need that much power; if you can do with 2200 mA of DC power (plus 800 mA of 9V AC), my recommendation is the True Tone CS12 – a very flexible power supply that can power 9V, 12V and 18V DC as well as 9V AC pedals, has one output that can go down from 9V to 4V to get interesting “starved battery” sounds from analog fuzz pedals; and comes at a decent price (currently 179 €). Also, a set of cables with various lengths is included; I just had to get one additional cable to set up my board (which is quite complex, with 11 devices needing to be powered).
I’ve A/B’d my board running a Voodoolab Pedal Power 2 vs. the CS12; the CS12 was the clear winner, the board got significantly less noisy, especially when combining digital pedals (Timeline, M5) with dirt pedals.
Mounting stuff
No matter how you mount your pedals: I would always recommend to first connect cables and test everything; especially if you use DIY cables. If it works, then start the real build. With an ES-5, you don’t have to wire up the whole board at once in advance; but rather, you can go loop by loop: Connect only the pedal(s) that will be in loop #1, with the correct cables that will later be used for loop #1. Lable those cables to make sure you will use them in the right place later. Power up ES-5 and pedals. Switch on only loop #1 on the ES-5, and activate the pedal(s) in that loop. Does it sound right? Now put the pedal(s) in loop #1 into bypass; and check if now there’s any volume difference between loop #1 being active vs. bypassed on the ES-5 (there should not be, unless your pedals have a buffered bypass that changes the signal level). Repeat for all 5 loops.
Many people use velcro to mount their pedals. I hate velcro, since it tends to not really hold pedals in position. Also, heat may losen the velcro parts glued to your pedals. Like, I once had a kinda heavy pedal (Pigtronix EP-1) velcroed to a board; I had to transport that board in an upright position in the trunk of a car in summer. After that, the pedal had slided like 5 cm (2") away from the velcro glued to its back that was supposed to hold it. Well, if you insist on velcro, you should chose 3M Dual Lock (a.k.a. the better velcro), and you should clean your pedals before attaching the 3M tape.
There’s other mounting techniques; like, some people use cable tiers, Temple has their own mounting plates ... my favourite solution is screws. I use perforated metal plates, other people use bicycle chain links or the dedicated “mounties” that companies like Harley Benton offer (which are much more expensive than perforated metal from the hardware store).
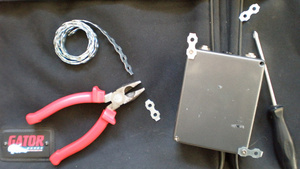
Now, you first take out at least two of the screws that hold the pedal’s backplate. You screw them back in holding a piece of perforated metal, as pictured above (I often put a piece of thin cardboard between the metal piece and the pedal, to avoid scratches on the pedal). You position the pedal on the board and use a white pencil to mark (through the empty perforated holes) the places where you want to fix the pedal on the board. I use a 2 mm drill (roughly 1/12") to make holes into the aluminium platform. These holes are very small, so you can make quite a lot of them without destroying your pedal board. Then, I use standard screws (like Spax universal 3 × 15mm) to mount the pedals. This really keeps them in position. Only one pedal on my board (the Octasynth) is velcro mounted, so I can exchange that one when I want to experiment with other pedals; and I can take it out to connect my ES-5’s MIDI jacks directly to my audio interface, for running the ES-5 editor software.
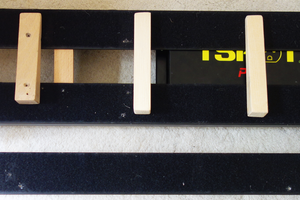
You can buy dedicated metal risers to elevate some pedals, so you can better reach their footswitches. I use wood wedges screwed to the pedal board for the same purpose:
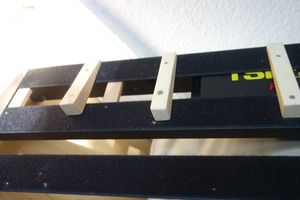
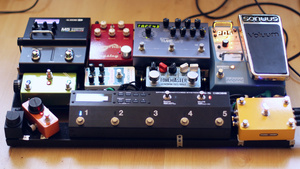
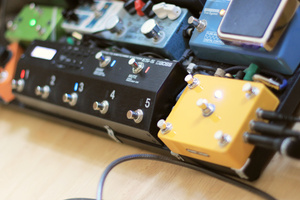
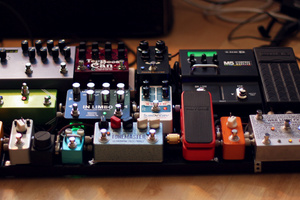
Works great to avoid stepping on the wrong pedal, and additionally allows to have cables running under the pedals, and to mount the pedals closer to each other. Now, when it comes to mounting pedals, you may have to connect some cables already, at least if you are building as tight as I do. This it what the board looks like with the pedals mounted:
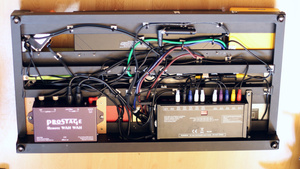
Under the hood, there is the Truetone CS12 power supply, the Prostage Remote Wah, and a lot of not really tidy wiring. It’s recommended to never run audio and power cables in parallel to avoid noise interferences; but rather to have them only cross orthogonally. The Nice Rack Canada guys would have surely been able to build this properly; me, having underestimated some cable lengths and lacking experience, I rather came up with something semi-messy ... but it works, and it’s rather low noise.
Once the pedal board is assembled, setting up your ES-5 and programming some basic Patches / template Patches would be the next steps.
Comments